If you are new to
sewing, and are wondering which sewing machine you should invest in as your
first machine, you cannot go past the Bernina 1008.

We had these sewing
machines to use at Technical College years ago, and Bernina are still making this model as it is so popular!.
We sewed with them
day-in, day-out.
We sewed everything
from lingerie and bathers to tailored suits, jeans and bridal gowns complete
with veils.
The 1008 is a
mechanical machine (no bells or whistles like the electronic or computerized
sewing machines), extremely reliable and simple to use in terms of threading,
control placement, bobbin winding, sewing in reverse, maintenance, size and
weight.
This model also has a good selection of decorative stitches which most
sewers would use.
If you are seeking a
fancier sewing machine, there are some features to consider.
My list of essential
sewing machine features (and why)
Needle can be stopped in down
position
 |
Needle can be stopped in down position
Being able to finish a stitch with the needle down skewers the fabric in
place each time you pause in your sewing (no slipping), or if you want to
lift the presser foot to adjust the fabric.
|
Knee operated presser foot
lifter
 |
Knee operated presser foot lifter
A knee lift allows you to keep both hands
on the fabric to adjust its position when sewing fiddly bits.
|
5 needle positions
 |
5 needle positions
5 needle positions are excellent for when sewing
double-stitched seams – you can sew along your first row of stitching with
the needle just off centre to sew a perfect parallel line.
Left, right and
centre are not enough.
|
Bobbin cases with large holes
or slots
 |
Bobbin cases with large holes or slots
It is easy to start winding
thread onto a bobbin if you can poke the end up through a hole in the bobbin
and hold it as the bobbin starts to spin.
Some bobbins have only one
small hole close to the centre – no use if you are adding thread to a bobbin
that already has some thread wound onto it.
|
Reverse button close to needle
and presser foot
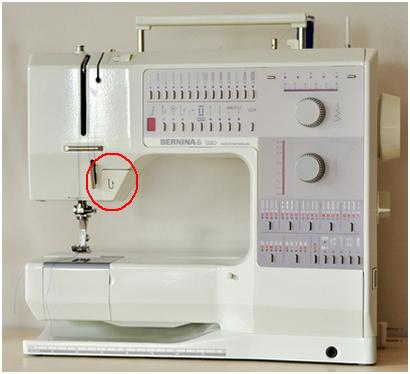 |
Reverse button close to needle
and presser foot
Having the reverse button close
to where your hands are when sewing makes it easier to keep everything in
place.
Some machines have the reverse
button over on the main body of the machine, so you have to take your hand
away from your work.
Having a reverse button just
near the presser foot means you can be pressing this in with one finger
whilst using the others to hold the fabric in position.
I have circled the reverse
button on this machine so you can see how well it is located.
|
Needle threader
|
Needle threader
Because my eye sight isn’t as keen as it once was, anything that enables quick needle threading gets a star in my book! |
Automatic button holes
|
Automatic button holes
Sew the first side of a buttonhole, and the machine copies this for all of the others, making a perfect set of button holes! |
Light does not cast shadows
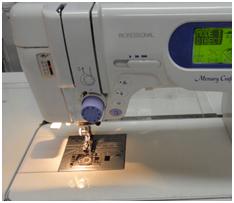 |
Light does not cast shadows
On some machines, the gadgetry around
the presser foot and needle is placed so that it tends to cast shadows over
the presser foot, right where you sew.
Or the globe is positioned so that
your hand guiding the fabric to the foot creates a shadow.
Something else to
watch out for is that where you hold your hand to control the fabric can be
right where the globe pokes out, so you burn your right hand all of the time.
|
Wide plate that can be
added to the arm
 |
Wide plate that can be
added to the arm
Having a U shaped plate that
can be clipped on to widen the sewing arm (the part where you place your
fabric as you sew) can make a world of difference to being able to manage
your fabric as you sew.
|
Bobbin can be filled without
unthreading needle
 |
Bobbin can be filled without
unthreading needle
Having two spool holders and a
separate winder for the bobbin thread is a blessing when you are all threaded
up.
I usually have two spools of thread, so can fill the bobbin using the
other spool holder and bobbin thread winder.
|
Sewing machine plate with clear markings
 |
Sewing machine plate with clear markings
You need to be able to clearly see lines on the sewing machine plate. These are used to be able to determine your seam allowance and sewing line as you hold the fabric when sewing. |
Sew4Home has an
excellent article on Top ten advanced machine features which I also, for the most part, agree with.
Sew, Mama, Sew has an exhaustive list of sewing machine brands and models, each
with a review.
Take a look, and you
will see why selecting a sewing machine is something each person has to do for
themselves.
(I have used a
friend’s machine, and the thread take-up arm shot up so high as I sewed that it
caught my fringe and pulled out single hairs each time I drew close to work on
a fiddly bit!)
You really need to
spend a good amount of time to go to a sewing machine shop, sit down at all
types of machines and sew all types of stitches on different weight fabrics
(take some with you), until you find one that suits you best.
If you have the space, a Horn Sewing Cabinet is perfect for storing your sewing machine and accompanying equipment.
What a wonderful idea – everything at your fingertips when you’re sewing, then you can pack it all neatly away when you’re finished, safe from inquisitive children and their fingertips!
Select a model that allows for a sewing machine and overlocker (a future purchase).

If you have the space, a Horn Sewing Cabinet is perfect for storing your sewing machine and accompanying equipment.
What a wonderful idea – everything at your fingertips when you’re sewing, then you can pack it all neatly away when you’re finished, safe from inquisitive children and their fingertips!
Select a model that allows for a sewing machine and overlocker (a future purchase).


